As per the manufacturers and experts, you have to sharpen the blades of hedge trimmer after every 50 hours of use. Luckily, sharpening a hedge trimmer is not a complicated task, especially if you have the proper knowledge. If you are wondering on how to sharpen the hedge trimmer easily without any professional assistance, then you can find the information in this article. Here, we have provided step by step instructions and several other information for your reference.
How Can You Tell When the Hedge Trimmer Needs Sharpening?
Identification is quite important to know when to sharpen the blades as it is difficult to count the duration you have used the tool, especially if you are home owner.
Best lawn mower blade sharpener Best Cordless Hedge Trimmers Best lawn sprinklers Best push lawn mower
It is time to sharpen the trimmer if you notice the below signs.
1. Unprecise or Inaccurate Cuttings
An ideal hedge trimmer should leave behind precisely cut branches, which look beautiful. However, if you notice uneven edges when you cut the branches, it indicates that your hedge trimmer needs sharpening. In this case, you can either take it back to your dealer and ask for a replacement. Or you can sharpen it at your home and get it back into a working condition.
2. Branches Getting Jammed in the Trimmer
A well-sharpened trimmer will never let the branches jam or interrupt the cleaning process. Instead, it will smoothly cut off the branches as soon as you bring it close to them. However, if you notice that the branches get stuck into the teeth of the blade and block it from cutting the branches further, it can be a problem.
Tools Required While Sharpening the Hedge Trimmer
Flat file Safety glasses or face protection Soft cloth Water STIHL solvent Whetstone Work gloves Safety clothing
Few Instructions to Consider Before Starting the Process
When you are beginning to sharpen the hedge trimmer, be sure you’re using a level surface, like a solid work table. It is best to stand still and then move it around while cutting the blades. This is safer and more convenient to do than hand-shifting the trimmer. Wear your safety gear! Even though the blades of your trimmer are rough, they could still be sharp and you shouldn’t to put yourself at risk. Therefore, ensure that you wear protective gloves and gloves to keep any foreign substances from entering your eyes. Make sure to remove the battery pack or unplug the hedge trimmer before commencing the cleaning. The very first tool you’ll need to sharpen your hedge trimmer is an abrasive file. The file should be filed toward sharp edges of blade, in order to make it sharper. You should use the file to the blade and before lifting it up off of the blade once you have moved it back. If you are filing across and up along the blade, this could result in the blade to be sharp! When sharpening the edge of a hedge trimmer, be aware of the number of strokes you’re using on each cutting edge, so you can keep them even. It is crucial to ensure that they’ll have the identical length. It is not recommended to reduce the thickness of your file by more than 5mm onto your blade, as this can result in the blade becoming damaged, so ensure you stay within the limits. The next step, you’ll need to use whetstone, so to smooth off burrs that may appear on the blades since you filed them. While using the whetstone, it is necessary to flip the trimmer so that you have an unobstructed view of the rear of the blades. Be sure to move the whetstone across the blades with a smooth sweep motion. Make sure you move the whetstone toward the blade’s edge and focus on smoothing out any rough spots you spot on the way.
How to Sharpen the Hedge Trimmer
Below, we have mentioned step-by-step instructions to follow while sharpening the hedge trimmer blades.
Step 1 – Clean the Teeth
While you’re cutting through the branches, the sap and resins usually settle on the blades reducing its sharpness. Before commencing the sharpening, it is recommended to clean the blades for a better finish. You can just wash the blades or wipe them using a cloth. But if the blades are too dirty, then you use soap water for cleaning purposes. Once the cleaning is complete, make sure to dry the blades using a dry cloth.
Step 2 – Align the Blades
Simply press the two blades in tandem and you’ll make them fairly close to being in the same direction. To achieve that precise part of alignment, use one of the handles from an older screwdriver. Place it in between your blades, and make use of the handle as a dry bar. The handle of the screwdriver keeps your blades from being damaged and will also move the blade in this distance in order to align them precisely. When the blades are aligned, you’ll notice on each blade there are at least two to three (depending on the model of blade) different surfaces you’ll need to sharpen. And if it’s a dual-sided blade, we’ll have similar surfaces on the reverse, meaning that there’s a total six surfaces that must be sharpened on each tooth.
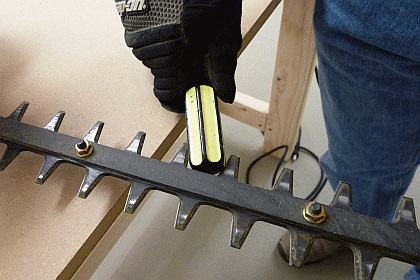
Step 3 – Using Whetstone to Remove Burrs
Now, fetch the whetstone. It’ll help you smoothen the burrs, which might have appeared on the undersurface of the blades while you were filing. For this process, you’ll have to turn your hedge trimmer upside down. This way, you can easily operate on the undersides of the blades. Make sure to moisten them with some lubricant while you’re working on them. Now, you need to draw your whetstone down the blade. Do this by performing a swiping motion that moves towards the surface or the tip of the blade. It will help you remove the burrs effectively.
Step 4 – Post Sharpening Care
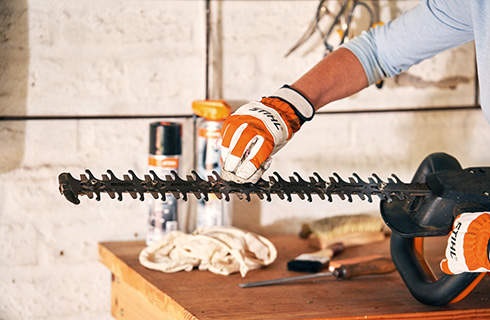
Now, you’re done with sharpening your hedge trimmer at home. It’s time for cleanup and things to do after you’re done. Look for grinding dust, which was generated during the filing process. Now, when you were filing the blade, you must have withered off the layer for corrosion protection which was previously applied. For this, you have to spray some cutting apparatus along with the STIHL solvent. It will help the machine or trimmer work continuously without showing any chances of damage due to rusting. Also, it’ll increase the life of your trimmer.
How to Use Mill File to Sharpen the Hedge Trimmer
Take off the bolts holding the blades together, then place them in the vice of a bench. Mill the file along every cutting edge. Be sure to keep the files at the exact angle of cutting edge. Mill file should be pushed towards the cutting edge, not forward and back. The mill file is especially designed to function this way, ensuring the highest cutting edge. Make sure you keep the sharpening angle. It is easy to find this in the manual of your machine’s operation. Repeat this process until the edges appear shiny. Sharpen the entire surface of each blade on every side. Blades have a wear limit of 5mm. Ensure that you don’t cut away excessively from the edges of the blade. The material might lose its the strength of the blade if you cut away more than 5mm. When you’re done making your filing, wash the blades with a damp rag. You can trace the cutting edges on an unfinished sheet of paper to determine the sharpness. The blade will cut the paper sheet in the event that they are sharp. Lightly paint the blades with Linseed oil prior to assembling. This will extend their life span and also protect them from corrosion.
How to Use Power Grinder for Sharpening the Hedge Trimmer?
Every time you operate any power tool, you’ll need to wear the proper safety equipment – eye protection and hearing protection. Begin by clamping the handle that is the hedge trimming tool onto the bench vice so that it isn’t swaying when you’re grinding. Once you have that secure you are now able grinding. Similar surfaces need to be ground, but we’ll be using grinding equipment instead of filing. Be careful to maintain the same angle as grinding. The grinder is quicker than the file so, make sure you don’t remove too much of the tooth. Repeat this procedure on the opposite side. To complete, all you have to do is repeat the same procedure on each tooth towards the end of the bar.
How to Use Dremel for Sharpening Hedge Trimmer?
It is also possible to sharpen the trimmer using Dremel rotary tool. This tool offers precise and smooth movement.
Make sure that the hedge trimmer is in good condition before you begin sharpening. Make sure the blades are cleaned thoroughly to ensure that no stones or grass gets stuck to the blades. Get the Dremel sharpening kit ready. Be sure to attach all screws and nuts in the correct position. Make sure you wear eye or ear protector to shield yourself from the rumbling noises and sparks of light. Too many sparks and noises can cause permanent harm. If you’ve got a protective face shield, wear it. Then, during the day, sharpen so that you are able to clearly see. Attach the hedge trimmer to the bench vice. To improve the sharpness of the blades it is necessary to secure the hedge trimmer to ensure that it isn’t moving while you’re cutting. The Dremel should be turned on, and slowly move it to the hedge trimmer’s blades. To avoid over-sharpening cutting blades, use gentle pressure. Utilize short strokes since longer strokes result in an uneven sharpening of the blades. Be aware and ensure that you do not touch your fingers from the grinding. Repeat this procedure by repeating it for each blade.
Advantages of Sharpening Hedge Trimmer
Simple Trimming Process
A sharp hedge trimmer can make the trimming process much easier. The task will be completed quicker, potentially protecting yourself from sunburn during summertime.
Easy to Spot
It’s not difficult to spot a garden or a plant which a properly sharpened hedge trimmer has been employed to trim. They are generally quite tidy. In addition to that, trimming your shrubs using a an edged blade can assist in healing faster.
They Last Longer
The sharpening of the cutting blades on your hedge trimming tool on a regular basis will increase the life of your hedge trimmer. You will not have to pay additional money on parts replacement and your device will last for many years to the future.
Conclusion
Hedge trimmer make it easy to cut branches and maintain landscape easily without any issues. Over the time, the blades of this tool get blunt which results in unprecise cuttings. So, it become essential to sharpen the blades regularly. Not many home owners know the proper way of sharpening the hedge trimmers. If you want to know the easy process, then you can follow the step-by-step guide mentioned in this article. Hopefully the information has helped you. If you still have any doubts or queries, write to us in the comment section below. Comment * Name * Email * Website
Δ
![]()
![]()
![]()


![]()
![]()

