In the previous ESP8266 Project, we have seen how to write our own program in ESP8266 using Arduino IDE and control an LED using the GPIO Pins. In the same project, I’ve mentioned that by default, the ESP8266 ESP-01 Module comes with an AT Command Firmware. But if we write our own program to access the GPIO Pins (like we did in the previous project), the existing firmware will be completely erased and the new program will be written. Even though ESP8266 WiFi Module is manufactured by Espressif Systems, the SoC is used by many third party manufacturers to implement their own custom modules. In my case, I have the ESP8266 ESP-01 Module by AI-Thinker. This leads to a lot of questions like whether the firmware is original or not, is the firmware up to date or not and many other.
So, in this project, we will flash the official Espressif Systems’ firmware for ESP8266 Module using the official ESP8266 Flasher Tool provided by Espressif Systems which is the ESP8266 FLASH DOWNLOAD TOOL and Arduino UNO as the USB to Serial Interface. The ESP8266 Firmware can be installed for two reasons: If you want to update the ESP8266 Firmware to its latest version or to completely install the new firmware (in case it was overwritten by any program). So, let’s get started.
Hardware Setup for ESP8266 Firmware Update
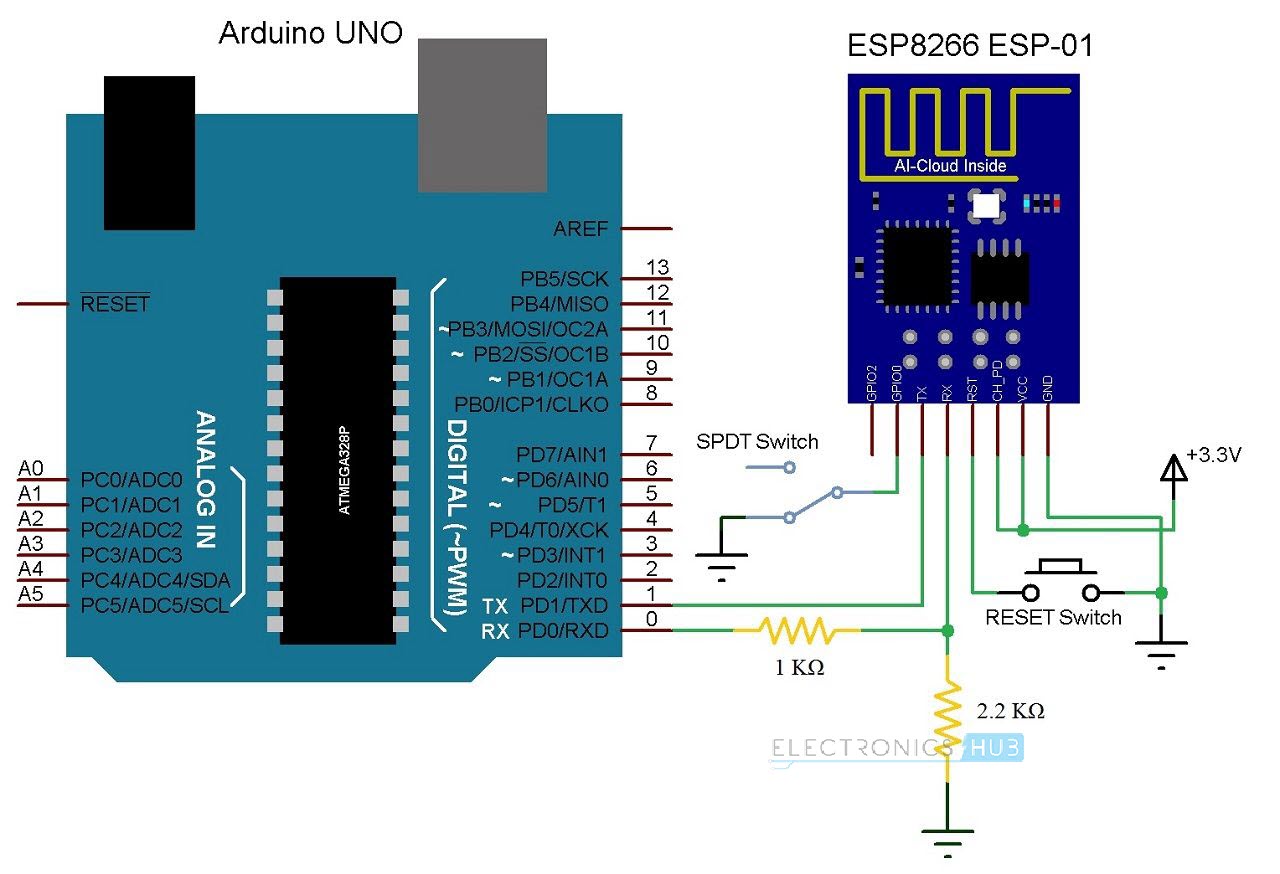
Before proceeding into the process of updating the ESP8266 SoC’s Firmware, it is important to configure the ESP8266 WiFi Module in Download Mode or Programming Mode. If you remember in the GETTING STARTED WITH ESP8266 AND ARDUINO project, I’ve mentioned that GPIO0 and RST Pins of the ESP8266 Module play an important role in configuring it in Download Mode. We will implement the same setup here as well. So, the connections are as follows.
VCC to 3.3V GND to GND TX to TX of Arduino UNO RX to RX of Arduino UNO (through level converter) GPIO0 to GND RST to GND through Push Button CH_PD to 3.3V
Circuit Diagram for Flashing the Firmware to ESP8266
The following image shows the circuit diagram for enabling the Flashing Mode in ESP8266. In order to put the ESP8266 SoC in Flashing Mode, the GPIO0 Pin must be connected to GND and a momentary GND Pulse on RST Pin.
Components Required
Arduino UNO ESP8266 ESP-01 (any ESP8266 Module) 1 KΩ Resistor 2.2 KΩ Resistor Push Button SPDT Switch Connecting Wires Mini Breadboard
IMPORTANT NOTES
Before proceeding further, please refer the previous project for configuring Arduino IDE and getting the Arduino UNO ready for flashing the firmware. I’ve connected the GPIO0 Pin to GND directly. And after flashing the Firmware, I’ve disconnected it from GND. You can use a SPDT switch to achieve this action i.e. in one position, the GPIO0 is connected to GND and in the other position, it is free to use as a GPIO. ESP8266 can’t tolerate 5V. It must be connected to 3.3V. Even the RX Pin of ESP8266 is connected through a level converter.
Checking the Current Firmware Version
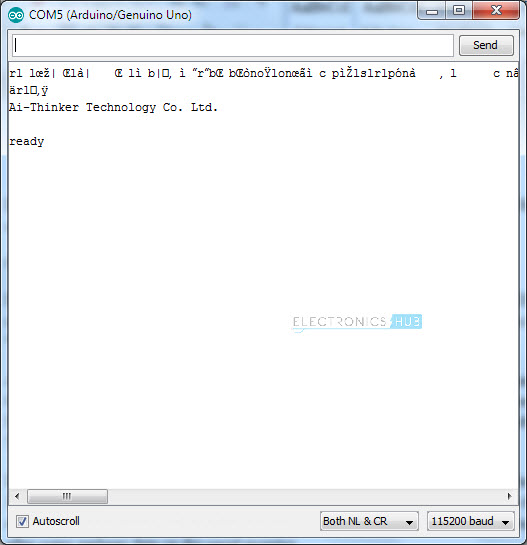
Before installing the Firmware, we will first check the existing firmware in the ESP8266 Module using serial communication. For this, we need to disconnect the GPIO0 pin from GND. IMPORTANT. After making the connections as per the circuit diagram given above (and disconnecting the GPIO0 from GND), plug-in the USB Cable of Arduino to the Computer and Open any Serial Monitor Software. I am using the Arduino’s Serial Monitor. You can use any software like Putty, Terminal, etc. In Arduino IDE, select the correct COM Port and open the Serial Monitor. Set the baud rate to 115200 and select Both NL and CR option in the serial monitor. After this press the RST Button of the ESP8266 for a second and release. The ESP8266 Module will reset and display “ready” after some garbage data on the serial monitor.
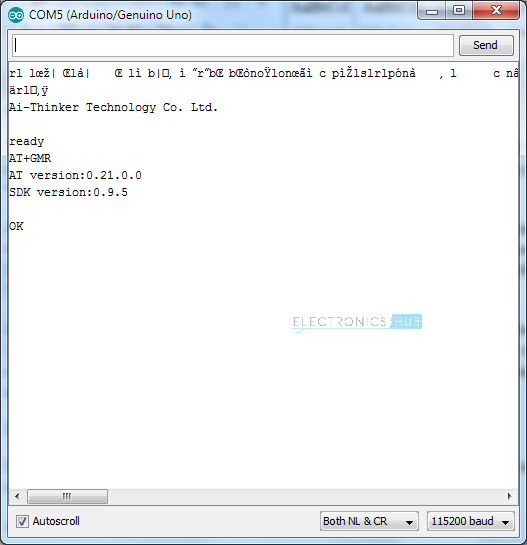
In order to check for the firmware version, you need to type the following AT Command and hit send. This command will return the firmware version of the ESP8266 Module. All the AT Commands should be in Upper Case. AT+GMR
If you notice, my firmware is by Ai-Thinker Technology, the manufacturer of my ESP8266 ESP-01 Module and it is pretty old one. The AT Command Set Version is 0.21.0.0 and the SDK Version is 0.9.5. I will now replace this firmware with the Espressif Firmware (the manufacturer of ESP8266 SoC). NOTE: Make sure that GPIO0 Pin connected to GND before proceeding further.
Downloading the Latest ESP8266 Firmware
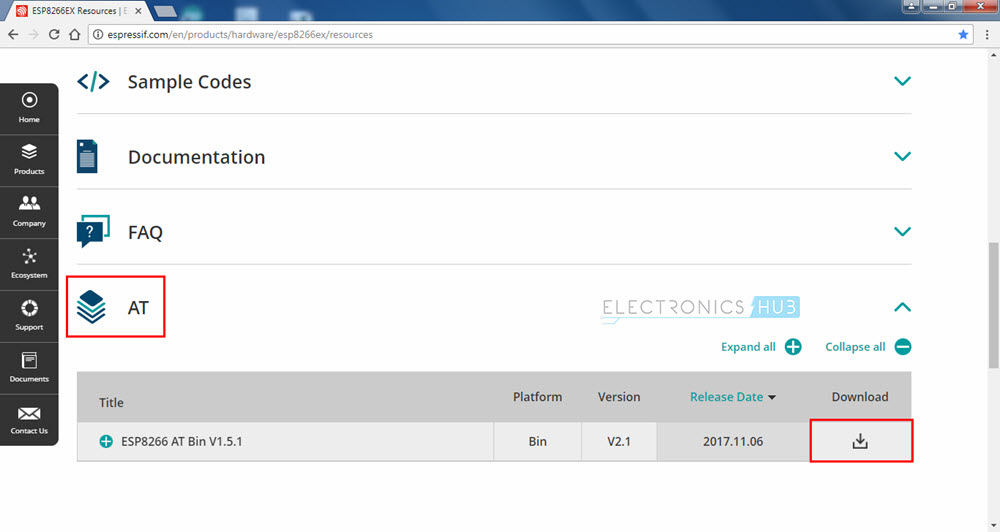
There are two types of SDK or Software Development Kits for ESP8266: Non-OS SDK and RTOS SDK. The Non-OS SDK, as the name suggests, isn’t based on any OS. Using this SDK, you can compile IOT_Demo and AT Commands. The RTOS SDK on the other hand is based on FreeRTOS. I’ll be using the Non-OS SDK (well, technically, the Firmware files based on the Non-OS SDK). The ESP8266 Firmware files are in the form of Binary Files i.e. .bin files. Now since I will be using only the AT Command Set of the ESP8266, I will download only the Bin Files associated with the AT Commands. In order to download the AT Commands Firmware for ESP8266, visit the official link here or directly download from this link.
There are other firmware versions for ESP8266 Module. Try the procedure mentioned in this project first and if you succeed, you can try installing other ESP8266 Firmware. Other firmware can be downloaded from the SDK section in the link mentioned above.
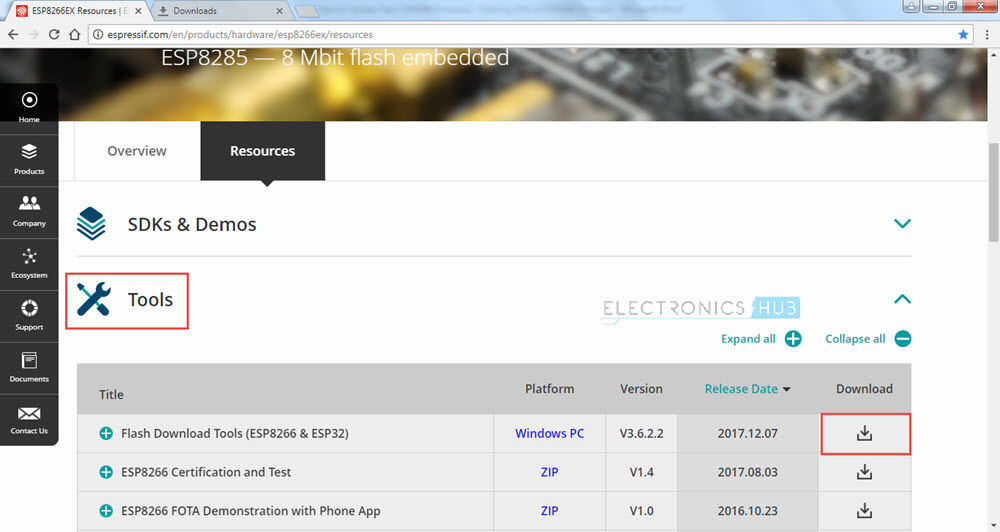
Downloading the ESP8266 Flash Download Tool
The next step is to download the Tool to update the Firmware of ESP8266. Espressif Systems developed a small software just for this purpose. It is called the ESP Flash Download Tool. In order to download the ESP8266 Firmware Flash Download Tool, visit this link and in the Tools section, download the ESP Flash Download Tools or you can directly download from this link.
Now that we have downloaded the Firmware and the Flasher Tool for ESP8266, we will proceed with installing the Firmware in ESP8266.
Installing the Firmware in ESP8266
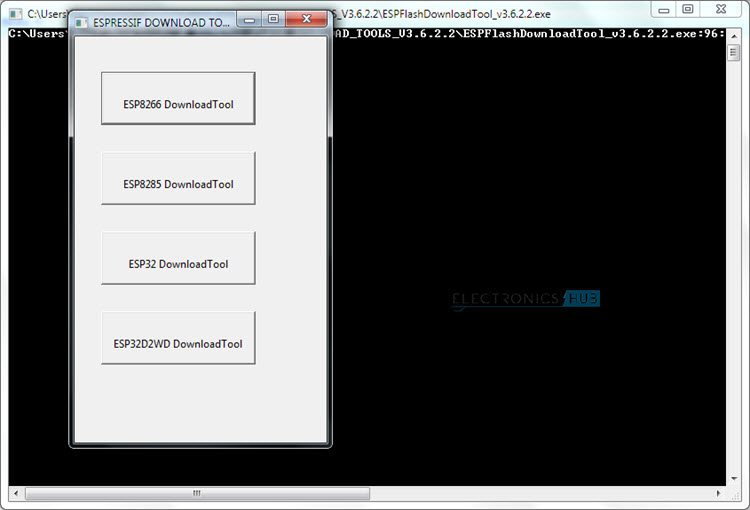
In order to flash the firmware in ESP8266, first open the Flash Download Tool or the Flasher Software of ESP8266. At the time of working on this project, I have the version 3.6.2.2. So, open the application file ESPFlashDownloadTool_v3.6.2.2. You will then get various options like ESP8266 Download Tool, ESP8285 Download Tool, ESP32 Download Tool and ESP32D2WD Download Tool. Select the ESP8266 Download Tool.
After opening the ESP8266 Flash Download Tool, you need to select the firmware files that we need to install. You need to upload four files at four different addresses. The following table will give you the list of files and their corresponding addresses.
NOTE: This list is for Firmware over the Air (FOTA) Flash Memory Mapping for ESP8266 Modules with 1MB of Flash. For other flash sizes, please refer to the ESP8266 Getting Started Guide, from this link.
File Address in Flash Memory boot_v1.7.bin 0x00000 user1.1024.new.2.bin 0x10000 esp_init_data_default.bin 0xFC000 blank.bin 0xFE000
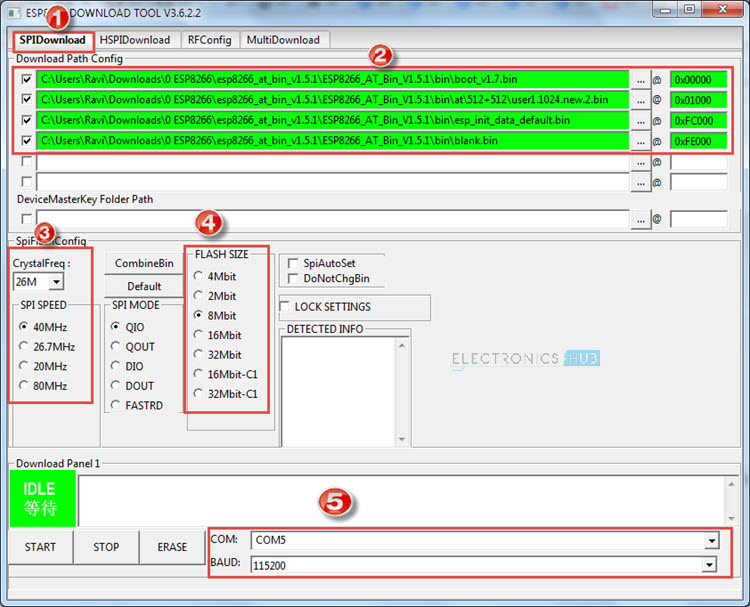
In the ESP8266 Download Tool, in the SPI Download Tab, select the necessary files in the “Download Path Config” option by click on the (…) button. Also, add the corresponding addresses in the space provided.
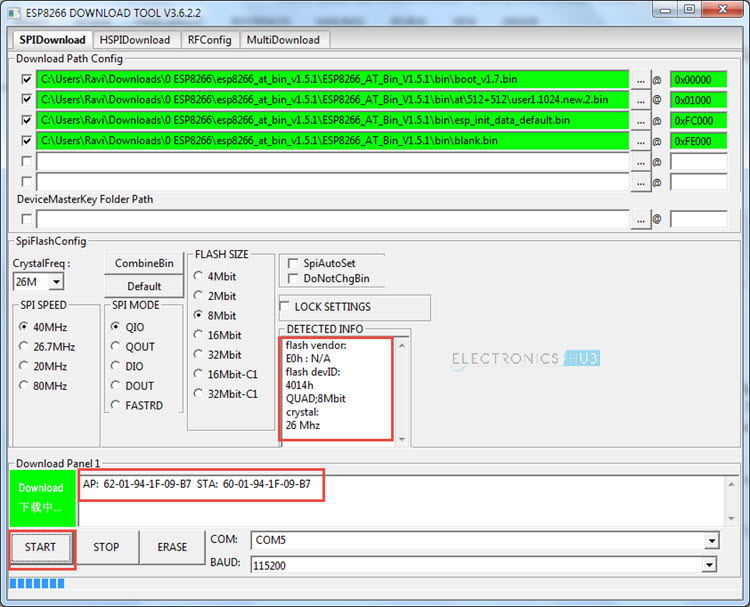
After selecting the four files and filling in the Addresses, set the crystal frequency to 26MHz (it is usually 26MHz but in case your ESP8266 board has a different crystal, enter that value). Next select the flash size. Since I have a 1MB flash on-board, I have selected the 8Mbit (which is equal to 1MB) flash size option. Finally, select the correct COM Port and set the baud rate to 115200. Make sure that all the serial terminal are closed. Before starting the flashing, check that GPIO0 is connected to GND and give a pulse LOW (push the Reset button) on the RST pin. Now click on START button. The flashing of the firmware in ESP8266 should begin. If you notice in the ESP8266 Firmware Flash Tool, the moment you click on START, you will get two MAC Address as AP and STA and also information about the Module in the DETECTED INFO section.
If everything goes well, the ESP8266 Module must be updated with new firmware. If there is any error, disconnect the USB cable, connect it once again, and after clicking on START, push the Reset button of the ESP8266. You will get a FINISH message on the Tool and you can close the tool after this. Disconnect the GPIO0 from GND and reset the device. Open the serial monitor of Arduino once again and check for new firmware.
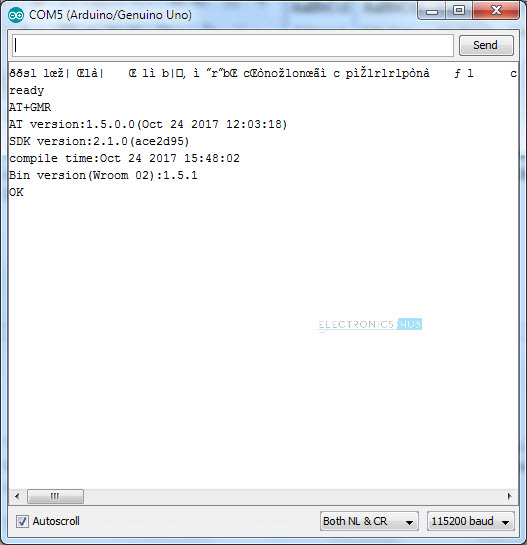
NOTE: Click on Reset button after opening the serial monitor. In order to check the firmware version, type AT+GMR and hit send. You will get a response with the AT Version number and the SDK Version number. In my case, the new AT Command Set Version is 1.5.0.0 and the SDK Version is 2.1.0.
In this project, you have seen how to update/flash firmware in ESP8266 Module using the official Espressif ESP8266 Firmware. load 0x40100000, len 2592, room 16 tail 0 chksum 0xf3 load 0x3ffe8000, len 764, room 8 tail 4 chksum 0x92 load 0x3ffe82fc, len 676, room 4 tail 0 chksum 0x22 csum 0x22 2nd boot version : 1.7(5d6f877) SPI Speed : 40MHz SPI Mode : QIO SPI Flash Size & Map: 4Mbit(256KB+256KB) jump to run user2 @ 41000 error magic! backup boot failed. user code done What’s going on? Is there a different BIN for ESP12? Both units send output, the bit’s are scoped at 12.3uSec, which is about 80,000 baud (not a standard baud rate) My guess? There is something corrupt in the firmware or the load addresses are wrong? Can you please tell me how you found those load addresses? Simple fix, use the MultiDownload tab, widen the window and just set and load a single module. It will load and behave correctly. This is not a problem with the above directions, the hardware or the firmware (1.6.2) it is a problem with the Download Tool. What should it do ? Before upgrading to a new SDK version, I downgrade my ESP module to an older version using this tool: Click Here Once the flasher tool updates the module with the older version, I then use the Espressif tools (together with the stated procedure) to upgrade to the latest SDK version. This seems to work for me. I can not offer any technical explanation why it would work, but it does. Hope it helps. ets Jan 8 2013,rst cause:2, boot mode:(3,6) load 0x40100000, len 2592, room 16 tail 0 chksum 0xf3 load 0x3ffe8000, len 764, room 8 tail 4 chksum 0x92 load 0x3ffe82fc, len 676, room 4 tail 0 chksum 0x22 csum 0x22 2nd boot version : 1.7(5d6f877) SPI Speed : 40MHz SPI Mode : QIO SPI Flash Size & Map: 8Mbit(512KB+512KB) jump to run user1 @ 1000 rf cal sector: 251 freq trace enable 1 rf[112] : 03 rf[113] : 00 rf[114] : 01 SDK ver: 2.1.0(ace2d95) compiled @ Oct 24 2017 12:04:16 phy ver: 1134_0, pp ver: 10.2 4. There is an error in “addresses on flash memories ” table. The address for user1.1024.new.2.bin file should be 0x01000 not 0x100000. ets Jan 8 2013,rst cause:2, boot mode:(3,7) load 0x40100000, len 2592, room 16 tail 0 chksum 0xf3 load 0x3ffe8000, len 764, room 8 tail 4 chksum 0x92 load 0x3ffe82fc, len 676, room 4 tail 0 chksum 0x22 csum 0x22 2nd boot version : 1.7(5d6f877) SPI Speed : 40MHz SPI Mode : QIO SPI Flash Size & Map: 16Mbit(1024KB+1024KB) jump to run user1 @ 1000 but no operation / AT cmd seems to work. How to proceed? Used AT firmware 1.7 from espressif Took me a while to find the right firmware but once I did I managed to flash my device to 1.5.1. (ESP8266 AT Bin V1.5.1) Interestingly the max version I seem to be able to upgrade to is 1.6.2 (ESP8266 AT Bin V1.6.2) using the same addresses as the guide. 1.7.1 transfers but the device is non-responsive. 1.6.2 seems to do the trick for what I needed. Regards Andrew Comment * Name * Email * Website
Δ
![]()
![]()
![]()


![]()
![]()

