USB ports are quite important for all systems as you will need them to connect various devices to use with your computer. As for the laptops, the number of USB ports available onboard is even less as laptops are becoming more and more compact and lightweight. Thus, most premium laptops offer 1 or 2 USB ports. Therefore, you must pay attention to the state of your USB ports and make sure they are functional at all times. A problem with even a single port can cause a lot of trouble as you will be able to connect one less device with your port. Generally, problems with most USB ports can be easily fixed by following a couple of solutions which we will cover in this guide. If you think you also have a problem with your USB ports, stick until the end of this article to find a solution for your problem.
Reasons Behind USB Ports Not Working
It would be pretty difficult to pinpoint the exact reason behind a USB port suddenly creating problems, or not working at all. As USB ports are dependent on many factors, there can be a number of reasons that could cause problems with your USB port. In most cases, the problem arises after a recent Windows update due to problems with the USB drivers included in the update. Other than that, there can be various other reasons such as improper power delivery, registry problems, or physical damage to the port. Also, there are many different types of problems that can occur on a USB port. In some cases, the port stops responding entirely which indicates hardware issues within the port. If not, the port will fail to recognize the devices that are working well with other ports on the same as well as other systems. This indicates a problem with the USB drivers installed on your computer. Another common problem with USB ports causes frequency disconnection which also prevents you from using your USB device with that particular port. Today, we will be considering all these reasons and try to resolve the issue once and for all. We will suggest trying all of the solutions provided in this guide to get a permanent fix for the USB port problem.
Methods to Fix Usb Ports Not Working Windows 10
As we mentioned earlier, there are a lot of factors that can cause your USB port to not work properly. Therefore, we have gathered the best solutions for the common USB problems on this list. Here, we will include a solution for the most common reasons that cause problems with USB ports on Windows 10. Make sure you follow the steps carefully to get satisfying results from your USB ports. Here’s how you can fix USB ports not working in Windows 10.
1. Verify Power Management Options
Many times, there are power management settings on Windows 10 that disconnect the idle USB ports from the computer to save power. This saves power as the USB ports that are not required do not get continuous power. The ports are enabled when you connect a USB device to them. But, sometimes the ports do not enable automatically and the computer fails to detect the USB device inserted into the port. You can solve that by following this solution.
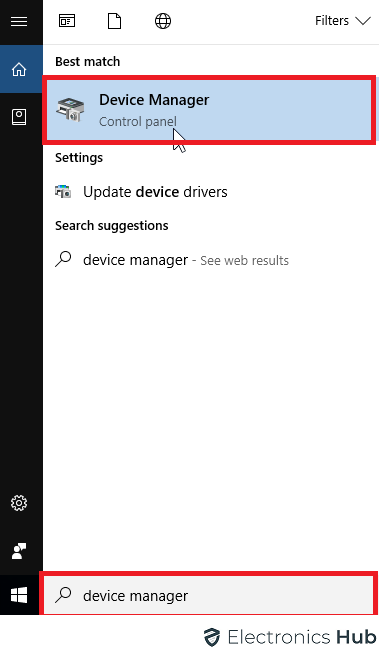
Open device manager by searching the term in the Windows 10 search bar and opening the first result.
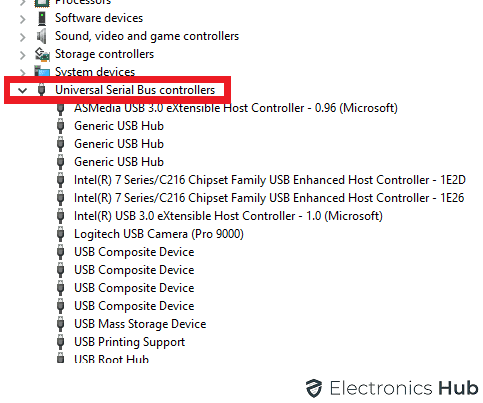
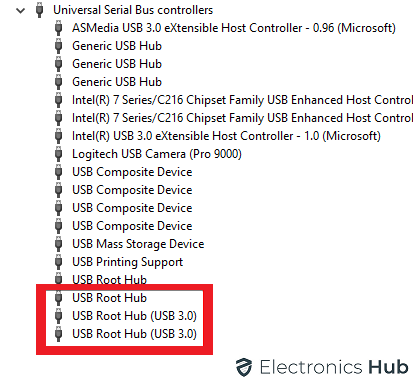
Now, you find a dedicated category for USB ports called “Universal Serial Bus Controllers”. Tap the arrow on its left
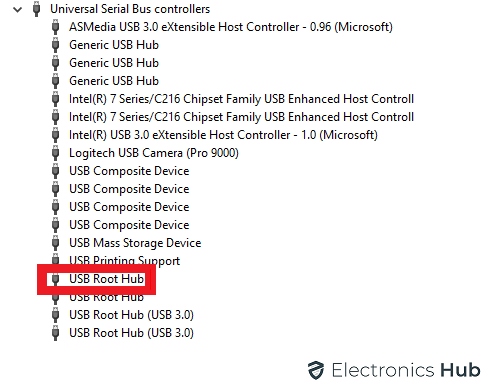
Now, find USB root hub option. Open the properties tab by right-clicking on it.
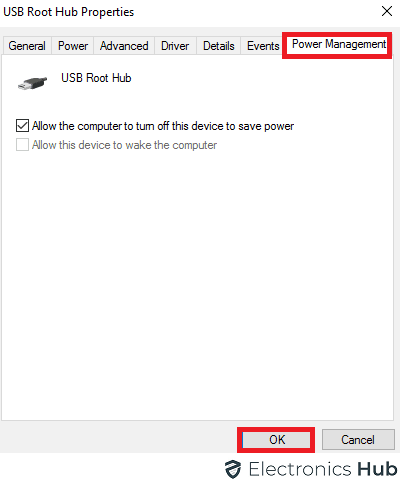
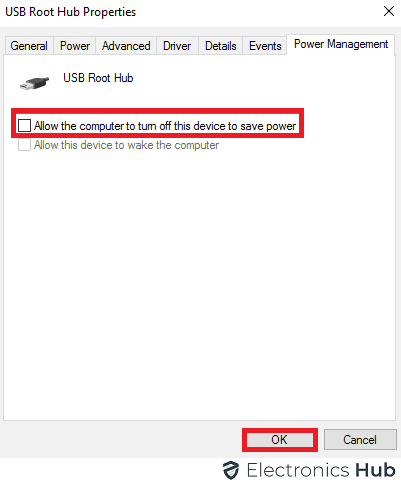
In the properties window, head over to power management option for the USB root hub.
In this window, simply uncheck the box that allows the computer to disable the USB ports.
Repeat the process for other USB root hub options if available.
Save by pressing OK and restart the computer. Now, your USB should be functional at all times.
2. Check Power Supply On Laptops
As we all know, laptops run on a limited battery capacity. Hence, the power management options are a bit more intense on a laptop to offer an extended backup period. Also, the power supply can sometimes ignore the USB ports or fail to offer enough power to operate the USB ports normally. Since this is a pretty common issue, you should follow these steps to verify it.
If you are continuously using your laptop while it is plugged in, you should first disconnect the laptop from charging and also remove the charging brick from the board. Now, reboot the laptop. Try reconnecting the USB device to the problematic port. If the port is functional, it means the problem only occurs when the charger is plugged in. If the port does not work, switch off the laptop again and remove the battery. Make sure you follow the instructions given by the manufacturer while removing the battery. Once the battery is removed, you can plug the laptop directly in to use it. Plug the laptop and turn it ON. Once the laptop is ON, check the state of the USB port. If it is functional now, it indicates a problem with the battery. If the USB port is not functional in both cases, follow the next solutions.
3. Reinstall Drivers
A lot of problems in Windows OS are caused by drivers. Improper driver installation or misconfiguration of the driver can be the culprit in the majority of cases. Even for a USB port not working probably, you can check the drivers and resolve the problem quickly.
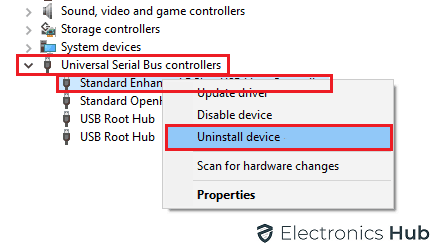
Open the device manager again on your Windows 10 laptop or desktop.
Find the USB Root Hub option under the Universal Serial Bus Controllers section.
In order to reinstall the drivers, you will first have to uninstall existing drivers from your system.
To uninstall the driver, simply right-click on the USB Root Hub and select uninstall. If there are multiple USB Root Hub options, do the same for all.
Once the drivers are uninstalled, simply restart your computer. Now, Windows will automatically try to install the necessary driver to operate the USB ports. If the drivers are not installed automatically, you can try to install the drivers by scanning for hardware changes in the Device Manager.
4. Update Existing Drivers
If reinstalling the drivers did not make the USB port functional again, you should try updating the existing drivers or your USB ports. You can do the same from the Device manager itself by following these steps.
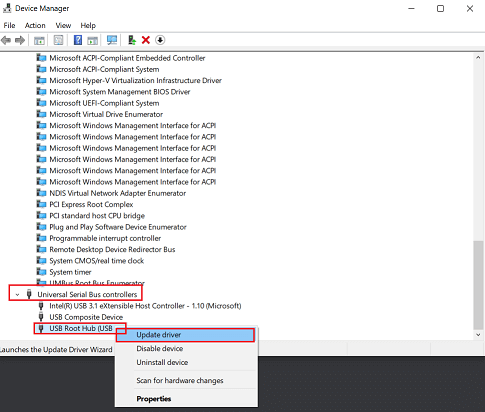
Open the Device Manager again and head over to the USB Root Hub as explained earlier.
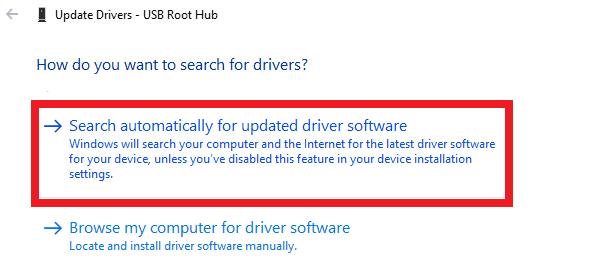
Now, When you right-click on the USB Root Hub option, select Update Driver.
Now, a new window will appear where you can select the method for driver update.
If you have the updates downloaded from an external source, you can choose the manual installation option. If not, simply select the automatic installation method. Repeat the process for all USB Root Hub options for better results. Once the drivers are updated, check if the USB ports are working or not.
5. Disable Fast Startup
If you are using the fast startup feature on your laptop or desktop, it might be preventing the Windows OS from detecting hardware changes at the time of boot. Thus, you need to disable the feature temporarily so that Windows can recognize the USB ports properly.
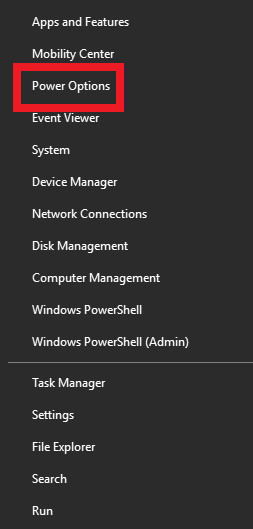
To disable fast startup, open the Power options on your Windows OS. You can find the Power Options when you right-click on the Windows icon on the lower-left section of your screen.
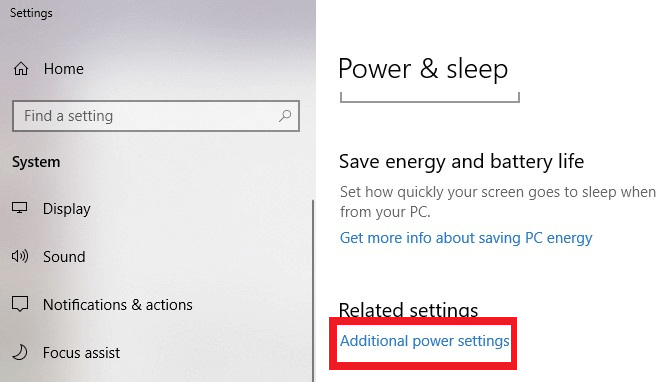
Scroll down on the Power & Sleep window and tap on additional power settings option.
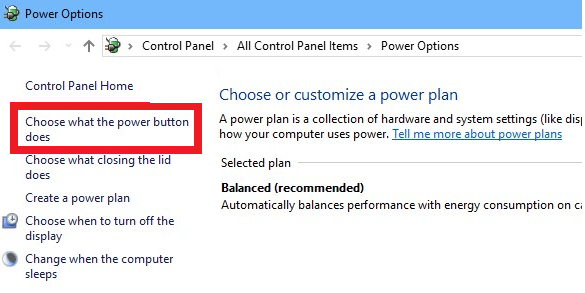
In the additional options, you will find the boot options under the power button functionality. Tap the second option on the left panel of the window.
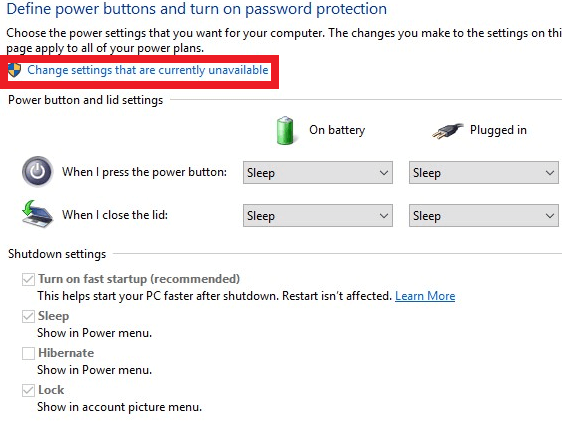
Open the top link again to access unavailable settings. You will need the administrative privilege to access these settings.
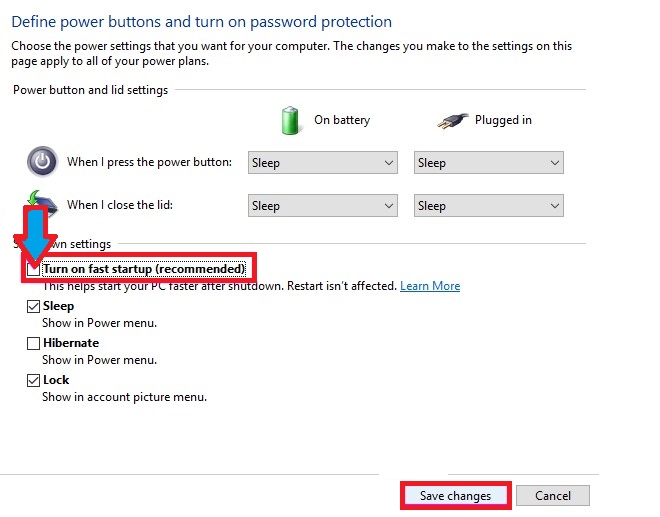
Now, you can disable the fast startup by unchecking the box that says turn on fast startup.
Save the changes and close the window. After that, simply reboot your computer. You will notice a slightly longer boot time as it detects recent changes in the system before booting. If the problem is resolved, you can enable the fast start up again from the power settings.
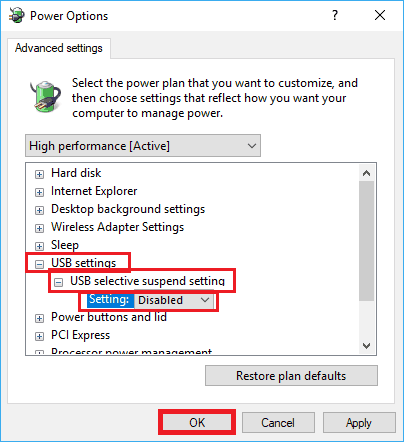
6.Turn off USB Selective Suspend Options
The USB Selective Suspend is yet another feature on Windows 10 that disables a particular USB port on the motherboard to save power without affecting other USB ports. You can turn OFF this feature to see whether it is causing problems with your USB port or not.
Head over to the power options again as mentioned in our last solution.
Now, open the additional power settings again by tapping the link.
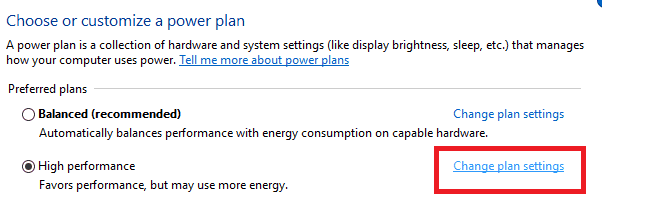
Here, you will see a certain plan for power management on your desktop or laptop. Tap on change plan settings to make the changes.
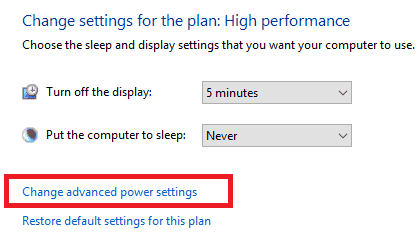
Now, tap the link that will redirect you to the advanced power settings.
In the advanced settings window, expand the USB settings. Here, you can change the state of the USB selective suspend feature. Open the drop-down menu and disable the feature for both battery and plugged-in power modes.
Now, your USB port should be active.
7. Check Registry Editor
You can also take a look at the registry editor in Windows 10 to check if the issue is caused by a wrong entry in the registry. Keep in mind that any improper changes in the registry can cause irreversible problems with the OS. Thus, it is wise to take a backup before making any change.
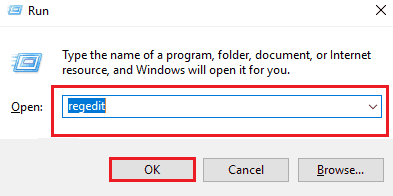
To open the registry editor, simply press Windows key + R and type regedit in the blank field, and press enter.
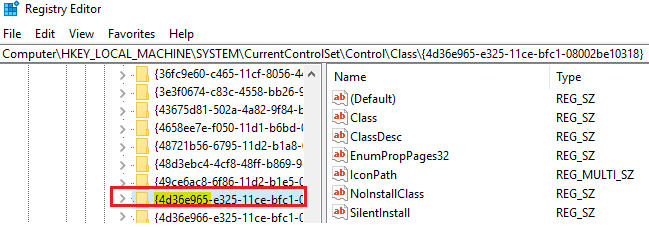
Now you need to copy the address given here and paste it where it says “Computer”.Computer\HKEY_LOCAL_MACHINE\SYSTEM\CurrentControlSet\Control\Class{4d36e965-e325-11ce-bfc1-08002be10318}
This shall redirect you to the exact folder where you need to make the changes.
On the right side of the window, find the entries called LowerFilter and UpperFilter. Once found, delete these entries. Now, close the editor and restart your PC. Now, the problem with your USB drive will probably be fixed.
Conclusion
We hope that one of the solutions provided in our guide has resolved the USB ports issue on your computer. If none of the solutions have worked so far, you should check with Windows update and windows troubleshooter to try and fix the problem. If the USB port or ports are still not functional, it means there is a hardware issue in the port and you will have to send the laptop or desktop for repairs. If you are facing troubles while following the solutions given here, drop a comment down here and let us know. Comment * Name * Email * Website
Δ
![]()
![]()
![]()
![]()
![]()

